Wednesday, December 18, 2013

Which Stich Holder?

I've come to the point in my knitting, that I became a bit to comfortable in just the basic knitting or purling; garter stitch or stockinette stitch (or stocking stitch ~ both terms are used often to describe the knit the odd rows, purl the even rows).  I needed to change things up.

Out came my "400 Knitting Stitches" book to look up something different to try.  Skipped the more difficult ones and stuck to the cables again.  I've completed a cable scarf in the past, but it's been awhile.  Started one almost a year ago and that skein of yarn became my "practice something knew and if I like it, it will become something for someone" skein of yarn.  It got ripped out, yarn balled up and set to waiting for another project.

This go around, I have been working on what is called "Plait 2".  It is an eight row, 15 stitch pattern that took me a few days to remember the pattern and to be able to look at the cable to figure out whether I am on row 3 or 7.  I've ripped it out a few times because to many sets of rows 1 through 4 had been done and the cable just does not happen then.

Anyhoot, the main point of what I wanted to share now was my preferance in stitch holders.  There are a few gadgets that can be bought to do this.  Most of the time, when searching the web, I've found the two styles I have, a Knitting Stitch Holder and a Knitting Cable Holder (make sure you use the term Knitting with the second term unless you are looking for electronic cable holders).

Here are pictures of the two on my current cable scarf:

 This is just a partial view of stitch holder, I prefer this while
working on cables.  They come in varying sizes, by numerous companies,
look like safety pins, hang vertically, and the stitches do not fall of the holder.
Added bonus is that the holder can be closed if you need to 
set the project aside mid-row.  It will not loose a stitch.

This is a Knitting Cable Holder (the red/orange colored, metal object).
It looks a lot like a metal knitting needle, with a bump in the middle.
I used this while working on my first cable a few years back.
Although it works okay, I found that if I wasn't careful, 
the needle could slide out rather easily.  For me, it seemed to get
in the way while I was working on the other stitches.

Which stitch holder will I use more often?  The Stitch Holder more often than not.  In a pinch, I would probably use almost anything I can get an individual stitch onto and off of easily.  It's just a preference and not a firm rule.

Happy knitting!

Sunday, December 8, 2013

Cable Stitches and Remembering the Row!

The last week or so, I have been working on a cable and it's been rather difficult for some reason.  At first, I didn't leave a boarder, which I realized quickly, makes the overall cable look a little nicer (in my opinion anyway).  Then, I'd forget where I was in the pattern and repeat the wrong part of the cable.  Anyway, ripped a few rows out, thankfully not the whole thing, and got back on track.  What I finally made for myself was the following:


Yes, just an index card, folded in half, 8 numbers and a paper clip.  If I have to set down my knitting, for a bit, I'll put the paper clip on the next row I'll need to work on.  This makes it a whole lot easier to know what I am doing next.  The two rows that are starred are the cable rows that I am either bringing stitches forward or backward, at various times in that row.  The other rows are knits and purls.  Easy enough when you remember where you are in the pattern!

So there you have it.  A homemade, row counter so you don't loose track and keep doing the same cable stitches over and over again.

In the near future, I'll write about which stitch holder I prefer!

Wednesday, December 4, 2013

I  haven't been as active with this blog as I'd like, but will possibly soon.  Actually thinking of things to write about, have a new camera (and a son taking photography), and hope to expand my knitting skills for just the sake of doing so.

In the coming days, hope to write about cables and my preference for holding the cable stitches, new stitches I am learning, selling items, and getting this blog out into "the knitting blog universe".

For now, let me know what you might be interested in reading about!

Take care and happy knitting!

Sunday, October 27, 2013

Thick and Warm

Completed another 4 strand baby blanket within the last few days.  Have to admit, I think this has become a favorite design for me.  It comes together so quickly and I don't have to decide on just one color of yarn.  I usually pick 3 or 4 different colors that go well together.  This time I choose:  Pearls, Delft, Pesto, and Rococo (see photo to the right)!  Something I noticed with this batch, Joanne's Craft has their own Home Spun Sleeve now, so no exchanging a color from one store at another store.  Drats!!!!!!!!!!

Something I did differently this time, toward then end, was to actually measure how differently each skein of yarn was.  I have knit thee blankets prior, with four strands, and each had at least one color way shorter than the others.  Assuming that the first skein to run out was exactly 185 yards, like the sleeve said, here are the lengths of the remaining 3 colors:
  1. dark brown - 130 inches
  2. blue - 199 inches
  3. light brown - 958 inches
That is quite a discrepancy as each is suppose to be 185 yards.  I keep meaning to send Lion Brand a question asking why such a difference.  A difference of just over 26 yards between shortest and longest.

Anyway, back to the blanket, I used the same basket pattern as previous ones I made for a set of twins.  Six rows were knit.  I began a pattern of knitting three, purling 30, knitting three more.  The next row I knit all the way across.  I kept this pattern until I was close to 33 inches and knit 6 more rows and bound off.  Again, I had to use the extra yarn form one color and attach to another.  I ended up running out of the green and dark brown by the end.  Believe I tied the blue to the green and light brown to the dark brown to be able to finish and not buy more yarn.

So, with out further fan fair, here are some photo's of the blanket I made!


These always turn out thick and warm!  Know little "J" will like this ~ at least I hope he does!

Wednesday, August 21, 2013

Four Strand Blanket

Earlier this summer I knit blankets for a set of twin girls.  My original plan was taking WAY.TO.LONG.  Switched gears to size 50 needles and 4 strands of Homespun by Lion Brand.  This style of blanket comes together real quick ~ each blanket took about 6 to 8 hours and I was able to get both done in 7 days (woo hoo instead of months).

For the blanket, I knit 36 stitches across and continued knitting each row until I had 3 inches.  Then, I a knit 3 stitches, purled 30, and knit the last 3.  On the next row, I knit straight across.  Repeated the knit/purl row followed by a knit row until whole piece measured 33 inches.  Knit until 36 inches and bound off.

As usual, it seems like some skeins of Homespun are WAY under the 185 yards and some way over.  I've had to join the end of another skein to one that just ran out.  I've always had enough, among the four skeins to finish the project.  Just be aware this happens.  Think it has been in the "Parfait" color, think bank to the various baby blankets I've made like this.

 Here, you can see the boarder ~ kind of!

 Picture of the whole blanket ~ almost!!

Braid off the final corner.  Made one blanket more pink
and the other more brown.  This just in case Mom and Dad
want to be able to tell the difference between the blankets.

Hope you enjoyed reading about this blanket.  Really easy, once you get past the HUGE needles.  I love how quick it comes together.  I'll still make blankets with smaller needles, just when I have more time to get them done.  When I need to get a project done quickly, it has got to be big needles.

I have a new camera on order and hope to begin taking better photo's soon!  Maybe the next project will look better on here!

Happy knitting until then.

Wednesday, March 6, 2013

Snow Day and Knitting

Hi all -

We've been getting snow, in March, since sometime after midnight today.  It's a wet, soggy, kind of snow.  Melts as soon as it hits your car or the street or the sidewalk.  Enough of a pain to close the public schools and government.  Home schools and Kevin's work are still open and work being done.

As we wrapped up school awhile ago, shoveled, consumed some hot chocolate, thought I should showcase another project completed.

Today's posting is a revamped wristlet, again.  Here is the post to the original pair I made.  I have remade mine one time to take out the thumb gusset portion, which made them a bit more snug.  They turned out well, but still a bit big.

 Around Christmas, a friend asked me to make a pair for her.  Her hands are a little smaller than mine, so I took out 4 stitches, from the revamped set, as the ribbing is a four stitch pattern (knit 2, purl 2).  Hope they work well for her.  Also, I plan to use the left over skein to make a scarf to go along with these.

I may do mine once again!  :)  Only after two other projects and possibly a third as I just received a bunch of Homespun!  GOT to make something with that!

Anyway, here is what these look like:
 I started with the one on the right, the then one on the left.
This is one thing I like about Homespun is how the colors change.  Always
makes for a beautiful knit project.  By far my favorite yarn to work.

Now if someone wanted to give me a large selection of other yarn,
I would gladly make things to see if I could be won over by something else.
Not sure who is will to donate some yarn though!  :(

Saturday, January 26, 2013

Long over due

I finished another baby blanket and passed it along, I think on January 6th.  And let me just say this will be the worst "how to" type post ever written.

     Why you ask?  Here's a few reasons:
  1. Late in posting ~ check
  2. Forgot to measure overall project before giving gift ~ check
  3. Can not find the sleeves from the skeins, so no color or brand of yarn (a new one to me!) ~ check
  4. Forgot what size needle I used (but can figure it out, I think) ~ check
If you'll let that slide, here is what I can go over:
  1. I knit with both ends so it's twice as thick..  Not really to difficult to manage the skein of yarn.  Just as easy as if you were using just one end.
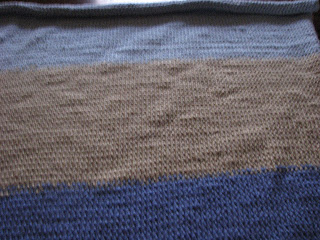
  2. I cast on 110 stitches of "Blueberry" ~ the darker blue.
  3. From there, I knit one side and purled the other to create a stocking stitch
  4. Once the skein got close to the end, I unraveled what was left, found the "center" of what was left, and cut the ends to be very uneven.  Did this because I wanted  mixture of first color and second color before moving totally to the second color.  Not sure if I first joined the inside tail of the skein or outside tail.  In the long run, doesn't matter to much because you'll end up using both.
  5. Kept knitting a row and purling a row with the second color (the tan shade) until just about finished and repeated the above steps of straightening out and joining the third color (the light blue).
  6. Knit and purled the rows until I had just enough to cast off.  At some point, I figure out how much yard I need to complete a row and figured out how many more rows I could do.  Think I finished the blanket with 6 inches of yarn left!
Here are various pictures for you:
Alone the center, you can see where the Blueberry and tan are joined together.
It was a very pretty effect.  If I were to repeat something like this, I'd go for more of the two colors.
For the first go around, this turned out well though.

Love the overall look!  So pretty!

Kind of close up!

I'll see what I can do to figure out the size needles, brand of yarn and colors for the tan and light blue soon.  Now I'll move onto other projects!